· 7 min read
An Overview of Next.js 13 App Router
Introducing the new Next.js App Router paradigm
I recently made the decision to completely revamp my portfolio website using Nextjs 13 with the new App Router pattern. I really like his new paradigm, and I wanted to share the core elements I learned during this process.
React Server Components
The React core team has recently introduced a new concept called React Server Component as part of the React 18 release. In a nutshell, it allows us to build hybrid applications where we choose the type of rendering we want to use at the component level between client-side rendering or server-side rendering.
React server components give us a tone of flexibility when building applications. Vercel has decided to make all components server components by default in App Router. Developers can switch to a client component by using the use client (opens in a new tab) directive when they choose to.

For more information about React Server Components, I recommend to read this blog post from the React core team (opens in a new tab).
Routing
Nextjs 13 uses the concept of file-system routing, which means that the way your files are organized will affect your routing system directly.
You will need to create an app directory instead of pages at the root of your project to take advantage of all the latest app router features like shared layouts, nested routings, loading components, and error handling. Your main component UI will be in a page file.
Here is a diagram that can help you understand how to create three different kinds of routes with the App Router paradigm:
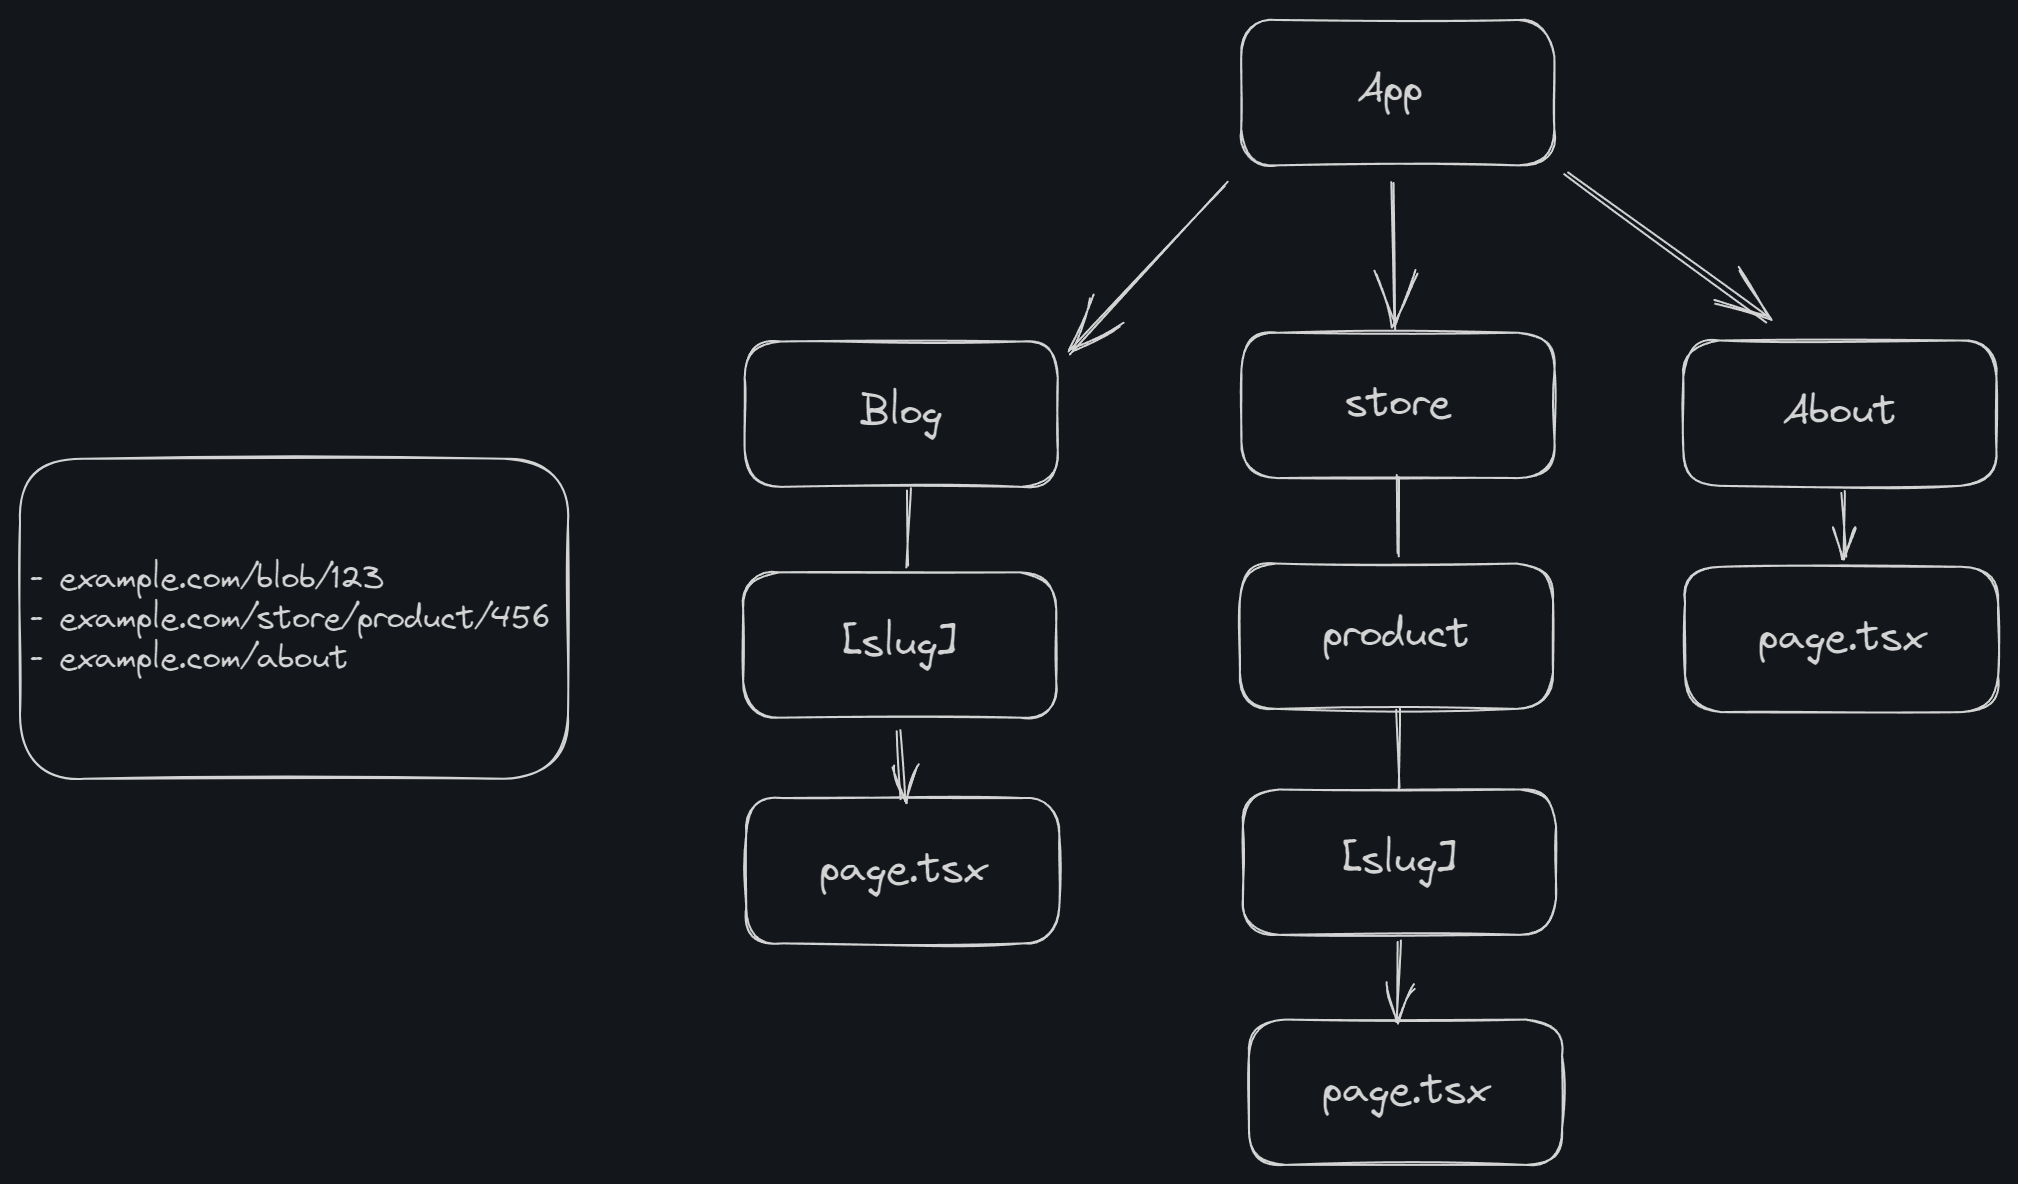
To understand the new File Convention proposed by Nextjs, it is important to understand the concept of the root folder and the subtrees.
In the previous diagram, the app constitutes the Root Segment, the blog, store, and about folders are Segments while the product folder within the store is a leaf segment.
All elements within the root segment folder (app) will encapsulate the files in the segments. For instance, if you create a layout within app/layout.tsx will be regarded as your RootLayout and will be the same for app/loading.tsx or app/error.tsx.
Each segment can have its own layout, loading state, and error-handling file.
These special files will be rendered in a specific hierarchy and use some core React API feature to create your UI as React Suspense for loading your components or adding a React Error Boundary component for error handling.
/** Here is an example of what the output will look like after using the special files hierarchy:
 * 1. layout.tsx
 * 2. error.tsx
 * 3. loading.tsx
 * 4. not-found.tsx
 * 5. page.tsx
 **/
<Layout>
  <ErrorBoundary fallback={<GlobalError />}>
    <Suspense fallback={<LoadingFallback />}>
      <ErrorBoundary fallback={<ErrorNotFound />}>
        <Page />
      </ErrorBoundary>
    </Suspense>
  </ErrorBoundary>
</Layout>
To get more details about these new file conventions, you can check the documentation (opens in a new tab).
Rendering
For this section, I won't delve too deeply into each type of rendering as my goal is to write specific articles about them in the near future.
Your application can be rendered in the client or in a server.
Client-side Rendering (CSR)
When a user makes a request to a server, their browser acts as the client. The server responds with raw data, usually in a JSON format, along with the necessary javascript code to compile the page. The browser then processes this data and uses the received javascript to dynamically generate the page.
Server-side Rendering (SSR)
In SSR, the server will generate the entire HTML page, this includes fetching data from databases, APIs, or other sources and rendering the content directly into the HTML template.
After the server completes processing, it responds to the initial request by sending back the HTML page that has been fully rendered to the client.
Before React 18, developers tend to use one of these approaches when building their apps. Now, with server and client components, React can render on both the client and server sides. This allows you to choose how to render your application code for each individual component.
As mentioned earlier, in the new Nextjs 13 version all components are server components, but you can still easily switch to a client component by using the use client directive.
'use client'

import { useState } from 'react'

export default function ToggleSwitch() {
  const [isOn, setIsOn] = useState(false)

  const handleToggle = () => {
    setIsOn(!isOn)
  }

  return (
    <div>
      <p>The switch is {isOn ? 'on' : 'off'}</p>
      <button onClick={handleToggle}>Toggle</button>
    </div>
)Note: Every component that will use React hooks, such as useState, useEffect, and useRef must be client components, as server components will not be able to handle these states’ lifecycles.
Data Fetching
NextJS 13 extends the Fetch Web API by adding more features, such as configuring caching and revalidating data.
Fetching Data
Through the utilization of server components, we can use the standard async/await syntax to gain access to promise-based APIs.
async function Post() {
  const note = await fetch("https://api.blog.com/...")
  return (
    <div>
      <h1>{post.title}</h1>
      <section>{post.description}</section>
    </div>
  )
}
To maintain a separation between your UI component and fetch function, you can directly use async functions in your components. This allows for greater reusability.
async function fetchPost() {
  const result = await fetch("https://api.blog.com/...")

  if (!result.ok) {
    throw new Error("No posts found")
  }

  return res.json()
}

async function Post() {
  const note = await fetchPost()
  return (
    <div>
      <h1>{post.title}</h1>
      <section>{post.description}</section>
    </div>
  )
}
Caching data
If you use the fetch Web API on Nextjs 13, your data will be automatically cached by default.
const result = await fetch("https://api.blog.com/...", { cache: "force-cache" })You can use the option force-cache or no-store to handle your caching strategy:
- Force-cache: When a request is made, Next.js checks the data cache for a matching response. If there is no equivalent response, it will fetch new data from the API source and update the cache.
- No-store: For each request made, Next.js will not check the data cache or update it with new data obtained from the API source.
Revalidating data
Revalidation involves clearing the Data Cache and retrieving the most current data. It's a helpful tool to ensure that you display the most up-to-date information when updates are made to your data.
You can use a time-based revalidation or an on-demand revalidation approach:
- Time-based Revalidation
If you want to update data at specific intervals, you can utilize the next.revalidate option in fetch. This will allow you to set the cache lifetime of a resource in seconds:
await fetch("https://api.blog.com/...", { next: { revalidate: 5000 } })- On-demand Revalidation
You can revalidate data on-demand by either the path using revalidatePath (opens in a new tab) or the cache tag using revalidateTag (opens in a new tab) within a Route Handler or a Server Action. "revalidatePath" enables you to revalidate data associated with a particular route path, while "revalidateTag" allows you to revalidate data categorized under a specific tag. You can include this tag while retrieving data.
await fetch('https://api.blog.com/...'', { next: { tags: ['publications'] } })Conclusion
I hope this article has given you a general idea of the latest features available in Nextjs 13, from routing to data fetching and caching. I may write more specific articles that focus on each feature in detail in the near future. So, stay tuned for updates!